Transmission adjusted, finally. I got a new TV cable from the parts store, installed it, and it was still screwed up.
Turns out the steel inner cable was way too long. I had to shim it with a pipe fitting and small clamp. After that, I was in business. Shifts in the proper places. Downshifts on demand. Shifts at 4000 rpm under WOT, just like it should.
Powertrain is done.
I also fixed the grabbing right rear brake. It would grab hard when cold, resulting in noisy skids and the like. Half a can of brake cleaner and some sandpaper to get the contaminated brake pad material off the shoes and the inside of the drum solved the problem. The fast idle valve is also working now.
That out of the way, I'm turning my attention to my house. I've installed new vinyl and carpet in the basement, and new vinyl and new paint in the kitchen. I've cleaned the grout in the bathroom, too. Pretty soon, this place my look like less of a dump.
Sunday, December 09, 2007
Sunday, December 02, 2007
Updates...
Been doing a lot of running around the past few days. Items that need attention:
TV Cable. It's fucked. The clips that snap it into the throttle side are all mangled. It's sort of flopping around, I think it may be contributing to my issues getting it adjusted.
Timing. It's pinging above 3100rpm. I think I need to take a couple of degrees out. I also think I may need some new plug wires.
Thursday, November 29, 2007
Iterations
I've been driving the Bucket all week on the new engine. Tuning with the Megasquirt has turned out to be and easy, but time consuming iterative process.
Basically, I drive somewhere and log the trip. During the trip, I try to run the car through as many throttle positions and loads as I can. When I get to my destination, I run the log through MegaLogViewer and have it re-analyze the VE table.
My first trip out, the car wouldn't spin past 3000 RPM. The map was just too out of whack. So far, I've got the VE map tuned out to 4200 RPM. Every time I analyze the log, the engine will spin a bit higher.
I'm also having issues with the TV cable adjustment on the transmission. It just isn't shifting correctly. There are also exhaust leaks on the headers, which are driving me insane. I think once I get the panels under the dash reinstalled, that might get a bit better. We'll see.
Almost through a tank of gas already. Gas milage seems to be abysmal, but I've been hammering on it and the VE table was crap, and the maladjusted transmission has the shift points all fucked up, so its been spinning higher in some cruise situations, so hopefully that will improve. Once I'm comfortable I have a table that won't blow the engine if I have to go WOT to pass something, I can start looking more closely at the cruise parts of the map and increasing fuel mileage.
Tuesday, November 27, 2007
Made it to work today...

I made it in to work in the Bucket today. Last night, after my soccer game, I drove it around the neighborhood, fiddling with various spots in the VE map to get it to not stutter and stall accelerating from a dead stop. I then fed the log of that session into MegaLogViewer and used its VE analyzer to "fix" my VE table.
I then drove it all the way to work with no problems. 12 miles. Super sweet. The picture is a screen capture of the log from the drive in today. I ran the VE analyzer against the log from the drive in this morning, too. I'll load that table in the car when I head home from work.
The torque convertor lockup works, too! What's better, I got it's 12v power from the old choke line, so when the TCC locks up, the choke light on the dash comes on and lets me know it happened. I'm pretty pleased.
Saturday, November 24, 2007
GAHHH!
So, it turns out I'm mildly retarded.
I've been fighting huge vacuum leaks this week. I replace the upper plenum and runner gaskets. Improvement, but still hear some pretty bad hissing. Turns out I didn't put O-rings on the driver side injectors. Derp.
Once I got that fix, bam. Vacuum leaks gone. Car starts. No hissing. Got it re-timed, and then it starts missing badly. Timing light shows that the poor thing is losing spark. Quick look at Megatunix, and I only have 10.8 volts coming out of the battery. An HEI module doesn't work very well below 12 volts. Turns out I left the pin I used to hold the brushes in the alternator down when I took it apart a few weeks ago. No brush contact with the stator = non functioning alternator.
Pulled the pin, put the battery on the charger. Going to give it an hour to juice back up and see where we are.
Wednesday, November 21, 2007
IT RUNS (again)!
Yesterday at 3:10pm, EDT, the Bucket started for the first time under TPI/Megaquirt power. It was amazingly easy.
I just got finished installing some electric fans, so now I can let it idle long enough to warm up fully, and then start tuning it. Yee-haw.
I just got finished installing some electric fans, so now I can let it idle long enough to warm up fully, and then start tuning it. Yee-haw.
Tuesday, November 20, 2007
Two days, lots of stuff...
I had all day Sunday, hoping to button it all up and start it.
Not so much. Leaks. Bad leaks. I pulled the fuel rail and replaced the O-rings on the injectors. Put it back on, hit it with the fuel pump again. Pressure shot up. Way up. Pegged the gauge. Not good. Pulled it off and dismantled the pressure regulator. Whoah. Big mess. The passenger side passage from the rail to the regulator body was completely clogged with some kind of shit, and the little tube that connected them was badly corroded. A bit of time with the bench grinder and some oversized O-rings fixed that point. A new fuel pressure regulator top took care of the totally fucked internals.
So, buttoned it all up and hit the pump again. Pressure shot to 50psi, and then the regulator went into bypass, just like it should. Then gasoline started dumping out onto the ground right below the driver side door. The return line was rusted all the way through.
This morning, I stopped in over at Street and Strip and grabbed another ten feet of braided steel hose and ran a new return. No more leaks.
So, I put the upper plenum on, hooked all the wiring and vacuum lines up, and then looked at the heater hose problem. I was worried I'd have to splice a return for the heater core into the lower radiator hose, but I lucked out. The radiator I bought last year has a port on the tank for the heater core return. All I need is a length of 1/2" heater hose and I can fill it with water.
After that, I need four small bolts to attach the water pump pulley, and then I can start it. If it fires, I'm going to jump up and down like an idiot.
Tuesday, November 13, 2007
Hammer time!
Well, I was really proud of myself. I went out to the garage after work, and again after my soccer game and some tasty Wendy's.
I wired the fuel pump and relay up. I fitted the fuel pressure gauge from the Buick onto the TPI rail so I could set the fuel pressure. I got the torque convertor lockup mechanism hooked back up, AND I hung the gas tank and put about a gallon into it (just what was in the lawnmower can).
Sensing near victory, I decided to run the fuel pump to pressurize the fuel system and see what I had.
What I had was a mess. One of the injectors is leaking, and the pressure regulator appears to be rubbish. As soon as the pump managed to suck some fuel out of the tank and actually pressurize the rail, the pressure shot up way past 60psi. Not what was supposed to happen.
Thankfully, I have a new regulator on the way. My air filter shipped from Amazon today. I'm going to have to pull the plenum off and pull the rail to replace the O-rings on that leaky injector, but that's not a horribly time-consuming job... I hope. Bonus is the regulator kit comes with a new set of upper plenum gaskets.
Monday, November 12, 2007

Progress over the past few weeks. I've gathered all the pieces for the fuel system. I gave up on trying to mish-mash up stock pieces, and just went straight -6 AN all the way through.
The first pictures is a feed line to go from the inlet on the fuel rail to the fuel filter.
The second is a nice shot of the front of the engine, you can see my supply and return lines hooked up to the rail. I'm reusing the stock vapor return line as a fuel return. It's a 5/16" steel tube, so it should work for a return.
 The third picture is my Walbro fuel pump. I'm running 3/8" rubber from the fuel tank to the pump, and then it's -6 AN from the pump outlet to the filter, and on to the rail.
 The last picture is the filter itself. For anybody doing this conversion that may be reading, give up on an aftermarket filter. The ones that can handle EFI level pressure are hundreds of dollars and have ridiculously sized inlets (-8 AN and up). Get a $6 filter for a fuel injected GM product, and buy these adapters. The filter has 16mm O-ring style fittings. The adapters I used to convert them to -6 AN were available at my local speed shop.
What's left? My mental list is getting shorter all the time. I need to put the gas tank back in the car and hook it up. I need a working electric fan for the radiator. I need to find or borrow a fuel pressure gauge so I can set the rail pressure. I also need to splice a tee into the lower radiator hose for the return from the heater core. Then its tighten everything down, put some gas in it, and see if it'll start. Maybe sometime this week? If I'm lucky...
Thursday, November 08, 2007
Parts a-comin'!
The fittings for the fuel rails showed up yesterday. The fuel pump should be here today. Hopefully I can mount and wire the pump Sunday, and after that it'll be a matter of getting enough AN line to hook it all up.
I'm starting to get excited.
I'm starting to get excited.
Monday, November 05, 2007
And on and on...
New Walbro fuel pump and the exact fittings I need ordered, and they were $40 less than the mess I returned this morning. I'm walking on air.
Sweet!
The auto parts store graciously accepted my return of the fuel pump I can't use and ten feet of fuel tubing I didn't use. $167 back into my checking account, and now I'm off to find a fuel pump that'll actually work.
Saturday, November 03, 2007
Friday, November 02, 2007
Steps at a time...
Well, the last two weeks have been a whirl, and not of things getting done on the car. But, I got back out there tonight.
I hooked up the fast idle valve, and got the throttle cable in.
For people looking to do this swap: use the accelerator cable from a 1989 Camaro (305, the parts store will not be able to get the cable for the 350... but they were the same). The hole in the firewall will have to be enlarged, the keyway nub must be ground off the part that clips into the firewall, and on the throttlebody end, some plastic must be removed so that the throttle plates will be able to open all the way.
The only electrical part left is the fuel pump. Unfortunately, the fuel pump I bought isn't going to work. If I can find the receipt, I'm going to take it back and use a Walbro 255. Fittings to adapt the fuel rails to -6 AN have also been ordered.
Sunday, October 14, 2007
 Well, busy day. You can see the pictures. The Megasquirt in the floor, the relay board all hooked up, and the original fuel feed line on the ground. The hardest part? Getting that damn fuel line out. I still have to extract the old vapor return line. That's not going to be fun, either. I did manage to clean up some rusty stuff and hit it with Rustoleum. Hopefully that'll arrest it for at least a little while.
The battery is back in the car, and all the sensors except the TPS are hooked up. I still need to find a TPS connector. I'll be in D.C. next weekend. Hopefully I can hit a scrap yard after I get
 back and pick up a TPS plug. I've also made my hose list. Lots of fuel line and some vacuum line. I've already picked up a flaring tool and a tube bender, and a fuel filter. Two weekends from now should be a fun one. I'll mount the pump and filter, and run the fuel and return lines.
After that? Charge the battery while I'm putting the gas tank back in, put some gas in it, and try to start it. I loaded all the default settings for the Megasquirt into the computer today. The guy that designed the unit has a TPI Chevy, so all the default stuff is for that engine. It should be painfully close on the tune.
I also need to figure out how to mount my fast idle thingy. May have to drill and tap the throttle body. Stay tuned.
Saturday, October 13, 2007
It's alive!

Lookie here. A live screen from Megatunix, the Unix based Megasquirt software. The computer is alive and works. It's reading live data from the MAP, coolant, and air temp sensors.
I travelled to a junk yard this morning and grabbed an electric fan... which didn't work when I got home. I did get a fuel block-off plate, and the fan looks in good condition, I may be able to fix it.
I then spent the afternoon getting the upper plenum and throttle body instealled, and then wiring up the injectors, coolant sensor, and intake air sensor. I also soldered power and ground leads to the relay board and ran the cable into the passenger compartment to hook up the Megasquirt. I'm very happy to report that it'll easily fit in the passenger footwell compartment vacated by the factory computer.
Anyway, off to the S.O.'s for some much needed grub.
Friday, October 12, 2007
Mockup fun...

Here you see a "something." This something is a very elusive something, so I'm going to type every descriptive term I can about it so that the next me that comes along can find the answer:
A vacuum advance HEI distributor will fit behind a TPI (Tuned Port Injection) setup.
I mocked up the tubes and upper plenum, and slapped the distributor in. It looks like I may even have more room to swing the distributor around than I had with the carb and old throttle brackets in the way.
I also started making a list of things I need. The way I have to route the upper coolant hose interferes with the mechanical fan, so I'm going to have to get an electric one. I need an EGR gasket and block off plate. I need a fuel pump block off plate. I'm hoping to take a trip to the junkyard tomorrow and see how much I can find cheap there.
I also have some other challenges.

Here you can see the front of the intake manifold, the top of the water pump, and the fuel line inputs. It's very crowded. I'm going to have to get clever in order to route the heater hoses and get the coolant temperature sensor wired.
More as I get further along...
Tuesday, October 09, 2007
Gawddamn!


This car really gets my goat sometimes. The first picture is the computer harness. One would think that getting it out would be a simple matter of cutting the plugs off and yanking it out through the passenger footwell.
Ahhh, not so much. I had to remove all the bolts holding in the fenderwell in order to get enough room to undo the two 8mm bolts holding in the grommet. Got those out and pulled it through. The leaves and shit? Mouse nest. It was sitting on top of the harness. A lot of that landed on my face before continuing on to the ground.
The second is the intake manifold. Bolted in and torqued down. I think have at least 10 hours wrapped up in making the middle four bolt holes work. But they work now. Its on. Now I can stab the distributor back in and mock the upper plenum in to see if it'll clear.
Beyond that, the hard work begins. Dropping the gas tank and finding out why the tank overflows onto the ground before the pump at the gas station automatically shuts off. Then I get to rip out the old fuel lines and run new ones, and mount my new fuel pump.

Sunday, October 07, 2007
And so it begins again...

Finally moving forward towards getting my Chevrolet TPI system installed on the Pontiac. Here you see the case for the engine compartment relay board mounted where the electronics that ran something or other was mounted.

The relay board installed.

Here's some nasty dremel work. The intake manifold is for a 1987 and later Chevrolet. The engine in the car is a pre-'87, so I have to make some changes to the four inner manifold bolt holes.
Monday, October 01, 2007
Squirt!
Here it is:

Yes, my MegaSquirt Fuel Computer. I will be using this wonderful device, a whole lot of wire, and a Tuned Port Injection setup from a 1987 Camaro on the Bucket. The GP will get fuel injection. Goodby carb, hello decent gas mileage.
Yes, my MegaSquirt Fuel Computer. I will be using this wonderful device, a whole lot of wire, and a Tuned Port Injection setup from a 1987 Camaro on the Bucket. The GP will get fuel injection. Goodby carb, hello decent gas mileage.
Painful Zs....
So, the Z broke two weeks ago today. I drove it to work that day. Coming off the highway on the way home, there was a violent bang and then some awful clanging and banging. I managed to limp it two blocks to the house, craw under it, and I see:

Yup, U-joint failure. Bad stuff. Not happy. Of course, I knew something like this was going to happen. The early Z cars had problems with this very thing. I actually already had the parts to prevent this in the bed of my truck.
So, I rebuilt the axles, and moved the diff back 30mm. This gives the halfshafts a straight shot from the diff to the hubs and eliminates this type of failure.
Purty pics:

Sanblasted parts

Powdercoating stuff

newly assembled axle.
The car is back on the road. It actually rides much nicer. Apparently straightening out the U-joint angles in the back also eliminates some vibration. I also had to get my driveshaft lengthened, and it was rebalanced as a part of that.
Yup, U-joint failure. Bad stuff. Not happy. Of course, I knew something like this was going to happen. The early Z cars had problems with this very thing. I actually already had the parts to prevent this in the bed of my truck.
So, I rebuilt the axles, and moved the diff back 30mm. This gives the halfshafts a straight shot from the diff to the hubs and eliminates this type of failure.
Purty pics:
Sanblasted parts
Powdercoating stuff
newly assembled axle.
The car is back on the road. It actually rides much nicer. Apparently straightening out the U-joint angles in the back also eliminates some vibration. I also had to get my driveshaft lengthened, and it was rebalanced as a part of that.
Tuesday, September 11, 2007
Wheel locks are bad, m'kay?
Well, I lost the key to the wheel locks on the GP. Big PITA.
I then got sick. Five days of vomit and diarrhea. Not recommended. However, once that all passed, I hammered a socket on the wheel locks and twisted them off. I then proceeded to snug up a front right wheel bearing, inspect the front brakes, and replace the shoes on the left rear corner, as they'd become contaminated with axle grease.
I'm looking at new cylinder heads now...
Tuesday, August 07, 2007
Updates trickling in...
It is hotter than a popcorn fart this month. Stupid hot. Icky-feels-like-you-are-sticking-your-face-in-an-oven hot.
As such, I'm happy to report that the A/C is still working fine. The new distributor is working great. The Autozone radiator I put in last summer is working fine, too.
I put new Bilstein shocks on it. Much better. Still getting a nasty vibration on certain sections of the Snyder. I'm chalking up to the body not being firmly attached to the frame behind the rear wheels.
I'm working on the Z again. Watch this space over the winter. I'm tired to half-assing it with that car.
Friday, July 13, 2007
Funness...
I found this video on my hard drive. Thanks to the miracle that is YouTube, you can see it as well.
This is from an autocross in 2004. There's no sound, so don't jack up the volume expecting any. Could cause a surprise the next time a sound plays on your machine.
This is from an autocross in 2004. There's no sound, so don't jack up the volume expecting any. Could cause a surprise the next time a sound plays on your machine.
Thursday, July 12, 2007
The truck
No cool pictures today, because this subject isn't worthy of pictures.
That subject, of course, is my truck. Its a rusty truck. Its white. It has a red dash and seat, rubber floor instead of carpet, and nothing else. It is a 1984 Ford F150 regular cab, long bed. I bought this truck from a friend almost three years ago for $1000. It had the 5.8L (351w) engine, four barrel carb, long tube headers, dual exhaust, and made big noise. I drove that truck for four months. It would often break down.
Then one day is asploded. Started pouring smoke out of it. I managed to limp it home, as it popped less than three miles from the house. I had to pop it into neutral and rev it to keep it running at the lights, all the while dumping smoke and oil out the tailpipes. I got it home and parked it out of the way, and there it sat for 7 months.
Then I went to a junkyard. Right there in row five at Amen Auto Salvage was a 1977 Mercury Marquis. Painted accross the windshield were the words "Big block, runs." It wasn't really a big block, it was a 400 cubic inch Ford V8, which is technically a small block, but who's counting? Anyway, we got a battery and started it. It did run. It didn't knock or smoke. I bought the engine and the transmission from the yard for $450. They even pulled it for me.
Over the next four months, I cleaned up that engine, replaced all the gaskets, put new cam bearings in it, a nice Summit RV cam, and had the transmission rebuilt. Since then, the truck has run well, but not perfectly. It had an overheating problem I ascribed to the 23 year old radiator, and it leaked oil badly, which I ascribed to the oil pan my father made for me because a rear-sump pan for this engine was $300.
Well, I put a new radiator in it last night, and during that operation, I found a bolt hole in the front cover with a bolt missing. The source of the oil leak. I'm happy to report that with the new radiator and that hole plugged, it no longer gets hot, and it doesn't leak. I'm stoked. Now I can think about getting a trailer so I can tow the Datsun around.
Friday, June 22, 2007
Plugging leaks
I fixed the axle seal leak.

This is the offending axle seal. I wasn't nice when I removed it.

This is the passenger side axle out of the car. My first GM axle removal. Surprisingly easy it was.

This is the new axle seal hammered into place. The brakes had been contaminated by gear oil, so I had to replace them as well. No photos of that, because I hate drum brakes, they hate me, and the install didn't go very smoothly.
This is the offending axle seal. I wasn't nice when I removed it.
This is the passenger side axle out of the car. My first GM axle removal. Surprisingly easy it was.
This is the new axle seal hammered into place. The brakes had been contaminated by gear oil, so I had to replace them as well. No photos of that, because I hate drum brakes, they hate me, and the install didn't go very smoothly.
Wednesday, June 20, 2007
The ultimate solution... and some more problems.

Right here is the ultimate solution for my ignition problems. A whole new distributor. Sure, it's a Procomp, which means its Chinese crap, but for $69 shipped, I couldn't argue. My epileptic ignition timing is now rock steady, and the advance is better. Driveability way up, and car can now chirp second gear.
However, I noticed today that my passenger rear axle seal is leaking, so the rear end is going to have to come back apart. Nothing like an eight hour labor job to replace a three dollar part. Hooray.
Monday, June 18, 2007
Third ones the charm...
Alternators hated me last Friday.
On the way to work, I started hearing this high pitched squeal, much like you hear from a television, but louder. I glance across the gauge panel and see the voltage gauge pegged at 18 volts. Ooops. The regulator in the alternator has failed, and the alternator is stuck on full charge. This isn't going to end well.
Then the noise stops, and the needle on the gauge sinks to 13. Battery voltage. The alternator has cooked itself.
Then the smell began. Burning rubber. The alternator seized. Then the belt jumped the pulley. thumpthumpthump.
I managed to make it to the NAPA on Bishop Lane. Popped the hood and whoah. The belt was wrapped around the fan, and the alternator was still glowing red. Ouch. I went inside and bought an alternator. After the burned one cooled enough, I pulled it off the car and took it inside. The NAPA guys swapped the pulley, I put the alternator on my car, and off I went.
Thirteen hours go by, and I'm almost back home after a soccer game. It was a depressing game. We lost 3-1. Belt squeal, dim lights, 10 volts on the gauge. Damnit. Lost another. Got it home, popped the hood, and the plastic fan on the alternator had melted. Once I got the alternator off the car, it was obvious what had happened. A spacer was missing behind the fan when the NAPA guy zipped the pulley on with his impact. The fan was pressed against the housing, and as it spun, it heated up, melted, sagged until it caught a bolt, and then stopped. The mainshaft of the alternator kept turning, and the shaft cut through that fan like a dremel through soft plastic, until it too, heated up and failed.
It's now Monday. Alternator #3 is on the car, with the proper pulley and fan. Lets all cross our fingers.
Thursday, June 14, 2007
Air Conditioning!
Well, it's been a month since my last entry, and even longer since an entry pertaining to the Pontiac, but I finally have some news.
First, the car is running OK. Gas mileage is really bad (10-12mpg), and the speedometer is still way off.
However, I finally made some movement towards getting the A/C working.

Right there are my A/C lines. They leaked. New ones were ordered. Order was canceled because the part no longer exists. So, Roppels was nice enough to rebuild them for me. That done, I scheduled next Saturday for them to suck down and refill the system and set about putting everything back on tonight.

In this picture, you can see the compressor, the lines, and my new receiver/drier. It was about two hours of futzing, mostly getting the power steering pump to line up and buying a new A/C compressor belt at AutoZone. The A/C system is now back on the car. I also replaced the blower switch in the dash, as the existing one had the stem broken off. My next trip to Pull-a-part will have me nabbing a trim button for it and that'll be good as new.
Next Saturday the system gets recharged with wonderful R134a, and I'll be cruising in style and comfort... well, maybe comfort. I did wash it. At least the wheels are shiny again.
First, the car is running OK. Gas mileage is really bad (10-12mpg), and the speedometer is still way off.
However, I finally made some movement towards getting the A/C working.
Right there are my A/C lines. They leaked. New ones were ordered. Order was canceled because the part no longer exists. So, Roppels was nice enough to rebuild them for me. That done, I scheduled next Saturday for them to suck down and refill the system and set about putting everything back on tonight.
In this picture, you can see the compressor, the lines, and my new receiver/drier. It was about two hours of futzing, mostly getting the power steering pump to line up and buying a new A/C compressor belt at AutoZone. The A/C system is now back on the car. I also replaced the blower switch in the dash, as the existing one had the stem broken off. My next trip to Pull-a-part will have me nabbing a trim button for it and that'll be good as new.
Next Saturday the system gets recharged with wonderful R134a, and I'll be cruising in style and comfort... well, maybe comfort. I did wash it. At least the wheels are shiny again.
Sunday, May 13, 2007
Long time, no updates...
 ...and still no updates on the Pontiac. However, I have been busy.
I spent this past weekend at O'Reilly Raceway Park in Indianapolis. I entered my Buick into the Winged Warrior III Challenge, a performance auto event with all the proceeds going to the Riley Children's Hospital in Indy. Worthy cause, and the format of the event looked fun.
It was a three-segment points based competition. A drag race portion contributing 40% of the score, an autocross contributing another 40%, and a concours judging comprising the remaining 20%. Cars were classed according to modifications made.
 The first picture is me launching on the drag strip. The car was wonderfully consistent, clicking off 13.5s at 102mph. Good enough for first place overall in my class in the drag race portion of the event.
The second picture is my car at the concours judging portion. Every car started with a perfect score, and then points were deducted for stuff. I had no points deducted at all.

 The third picture is on the autocross course. The course they set up was huge. The average time was somewhere around 70 seconds. A normal course would be near 3o seconds long. It was a fun, but relatively simple course. Easy enough for newcomers to navigate without getting lost, but plenty of spots for experienced people to pick up some time. I finished fifth in my class in the autocross, being beating by MazdaSpeed Protoge NASA road race car, a Mini Cooper, and a few other much better handling, lighter cars. However, behind me were also much lighter, better handling cars.
However, at the end of it all, the dominating performance on the drag strip, the perfect car show score, and the surprisingly competative autocross performance granted me the overall first place in my class. The trophy is huge, and it's actually silver-plated metal, no plastic.
Friday, April 13, 2007
Pictures...
 So, I finally found my camera. Here's the rust repair pictures I promised. The first is, obviously, a big nasty rust spot. Second is the hole I cut out, and the third is the patched hole.
 On top of this, I finally got my second new speedometer gear in. Speedometer went from reading 25% high to 20% high. An improvement, but not good enough. Unfortunately, I'm all used up on available driven gears. I'm going to have to change the drive gear inside the transmission, which is going to be a royal pain in the ass.


Sunday, April 08, 2007
Carpet is in
I got the new carpet in. As expected from a $79 J.C. Whitney replacement carpet, it didn't quite fit perfectly. However, it fit well enough. It made all the difference in the world. The interior of the car no longer looks old and junky. It still looks old, but not as junky.
I also removed most of the stains the seats with GooGone while I had them out. The new seats didn't go in. I still need to make some adapter brackets, but I needed to get car back on the road. Maybe when the weather warms up.
I also took a moment this weekend to put new pilot jets and pilot adjustments screws into the carbs on the 240Z. I think I've eliminated a pesky carb backfire. We shall see on Sunday.
And... Happy Easter.
Monday, April 02, 2007
Rust rust rust...
So, I set out early Sunday morning to replace the carpet and seats in the GP. Got the seats out, pulled the carpet easily enough, and there it was. Rust. A spot, about a foot back from the front of driver side door opening. Stuck my finger right through it.
Thirty minutes later, I had cut out a 5"x6" section with the grinder. Bolted the driver seat back in, and headed over to my Dad's to use his welder. An hour after that, the floor was patched. I headed home. I have pictures, I'll have to upload them tonight.
Pulled the seat back out, went to mock up the new Camaro seats in. And... they don't fit. 1" too narrow. I have some very generous friends, though. They think they can get me some leftover 1/8" plate I can cut into adapters. Until then, I'm driving the truck, though I may get out the Z tonight.
Wednesday, March 28, 2007
Results from Sunday!
Sunday's race went very well. I sucked as a driver, but the car performed perfectly.
Actual event results are over at KYR's website.
I didn't place very well, second from last in my class, but there's always an explanation. Mine is I couldn't drive yesterday. Every attempt to use the loud pedal resulted in large amounts of wheelspin and general uncontrollableness. I was also the only car in my class not on race rubber. I spun three times in my first run, and my best run didn't even crack the top 50% of raw times.
The next event is on the airfield at Fort Knox. I'll have the r-compounds on, and that place has a lot more grip. I should do better.
On the its-a-small-world-after-all front, I ran into the father of a very old, very good friend. Hadn't seen him or my friend since early 2000. Good to get connected again.
Anyway, I think this brings our detour into the land of Datsun to a close for a while. This weekend, I plan to replace the seats and carpet in the Grand Prix. Expect photos of really nasty things. There's a huge lump in the carpet under the passenger seat. That lump does not have a corresponding dent in the floorpan as seen from underneath the car. I have no earthly idea what could be in it. I will be wearing gloves and eye protection when I cut into it, though.
In other news, my Grand National was accepted into the Winged Warrior Challenge (Link), to be held May 12 at O'Reilly Raceway Park (formerly IRP). It's a combination Drag/AutoCross/Concourse event, with proceeds going to charity. Looking at last year's results and the cars in my class this year, I'll be firmly mid-pack on the quarter-mile, probably lower third in the Autocross. I'll just have to make sure the thing is very clean and make it all up during the concourse judging.
Saturday, March 24, 2007
Here it is
 Well, here it is. Dash back in the car, ready for tomorrow's Solo II event. The unsightly wiring you see hanging under the steering wheel is my fault. I cut two wires too short, and the bunch won't tuck up behind the dash. I'll have to lengthen those two wires later this week.
For the first time since I've owned the car, all of the heater controls work. I have a circuite left, which I'm going to use to put a radio back in the car.
I drove it to Lowe's and returned some stuff I hadn't used. I'd forgotten just how violently fast this car is. Driving the Grand Prix makes it even more apparent. Lights have also never been brighter on this car. I'm really, really happy right now.
Z's alive!
Got the dash back in tonight and started it.
All the lights work, the tach works, volt gauge works. Autometer lights work, but the speedometer's do not. Going to have to pull it back out and figure out what's up with the Speedometer lights, or maybe I just didn't ground the gauge housing well enough.
Anyway, it needs coolant, and I need to figure out how to get the water temp gauge sender installed. H&S actually has a good selection of metric pipe fittings, so hopefully I'll get lucky.
Friday, March 23, 2007
Fun times in Belmar
 Big progress this week, I've completed all the wiring necessary to run the car. Here I have pictures of the back of the dash, the front of the dash with all the gauges (yes, I know the three little ones are crooked, I'll bend them straight once it's in). The last is the passenger floorpan near the MSD.
The only things left are:
1) Wire up the heater
 2) Wire up the wipers
3) Hook up the heater core and refill the radiator
4) Put the dash in, and start the car.
5) Hammer

Monday, March 19, 2007
Complicated combination switches are teh debil
The car came apart way too easily. Saturday and Sunday were almost entirely taken by figuring out the five-thousand terminal, thirty position switch set that does the turn signals, brakes, and hazard flashers.
Finally finished those tonight. I also have the starter working and the fuel pump.
Left to do? The gauges, headlights, corner lamps, and the alternator.
Finally finished those tonight. I also have the starter working and the fuel pump.
Left to do? The gauges, headlights, corner lamps, and the alternator.
Saturday, March 17, 2007
Purty, purty
 Lots done tonight before my 9:30pm soccer game. I managed to remove the heater box, pull the heater core, and flush it out. Lots of nasty rusty stuff inside. I flushed it until the water ran clean, so hopefully it'll be less crappy now.
This picture is the dash. I've removed all the stock gauges and the wiring, and so far have installed the new tach and the water temperature gauge. I'm making little mounting brackets from a piece of sheet steel left over from the ductwork on my furnace. The speedometer is still installed in this picture. I pulled it after I got home from my game, dismantled it, and cleaned it. It looks much better now.
Thursday, March 15, 2007
A sideshow of sorts...
My 1970 Datsun 240Z is a classic. My example carries VIN HLS30-00303, the 303rd chassis built, finished sometime in November of 1969. It was among the very first two or three shipments of the now-famous Z car to the United States.
My example was uncovered by my good friend, Emohn, several years ago. We went in on the car together with bright hopes of turning it into a GRM $2003 challenge car. As we learned more of the history, and wrestled with some of the problems of it having sat for seven years, that hope was extinguised. I eventually bought out Emohn's half, and now this car is my full-time autocross car.
I've put most of my time and money into the engine and the suspension, to great benefit. The car is a rocket, handles well, and is an absolute blast to drive. While I can't compete for first in my class, I'm never last. In SM2, that's an accomplishment by itself considering the age.
However, all is not rosey. The wiring is original, and it sucks. I had two electrical fires inside the dash last season. Both times, I band-aided it, but no longer. I was finally forced to deal with the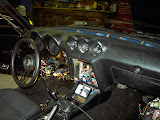 problem when the alternator could no longer keep the battery charged. The alternator is brand new, the voltage regulator is brand new. Something in the harness is drawing so much power, the puny 50 amp alternator simply can't keep up.
The first picture is the dash. Looks nice from here.
The second is after removing the heater controls and the dashplate against the window.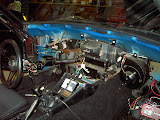
The third is the dash out of the car. In the center is the heater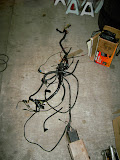 box. That's coming out next. The core is clogged, and the thirty year old hoses that feed it are cracked and leaking. Once I got the dash out, I spent an hour and a half wrestling the engine-side harness through the firewall and out of the engine bay. It sucked.
The plan now, after getting the heater core spiffed up, is to mock in the new fuse panel, and get a GM 90 amp alternator mounted. I'm going to keep the interior harness that feeds the dome and rear lights. Being inside the car, it's not in very bad shape. The engine side will be completely replaced with new wire all the way out to the front turn signals and headlights. The dash will also be getting new(er) Autometer gauges. I have a 5" tachometer, oil pressure, volt, and water temperature gauges to replace the intermittently working stockers.
It will be a very busy weekend. I have to have this thing back together and running by 8am on March 25.
Oh, and Louisville beat the snot out of Stanford today. Go Cards!

My example was uncovered by my good friend, Emohn, several years ago. We went in on the car together with bright hopes of turning it into a GRM $2003 challenge car. As we learned more of the history, and wrestled with some of the problems of it having sat for seven years, that hope was extinguised. I eventually bought out Emohn's half, and now this car is my full-time autocross car.
I've put most of my time and money into the engine and the suspension, to great benefit. The car is a rocket, handles well, and is an absolute blast to drive. While I can't compete for first in my class, I'm never last. In SM2, that's an accomplishment by itself considering the age.
However, all is not rosey. The wiring is original, and it sucks. I had two electrical fires inside the dash last season. Both times, I band-aided it, but no longer. I was finally forced to deal with the
 problem when the alternator could no longer keep the battery charged. The alternator is brand new, the voltage regulator is brand new. Something in the harness is drawing so much power, the puny 50 amp alternator simply can't keep up.
The first picture is the dash. Looks nice from here.
The second is after removing the heater controls and the dashplate against the window.

The third is the dash out of the car. In the center is the heater
 box. That's coming out next. The core is clogged, and the thirty year old hoses that feed it are cracked and leaking. Once I got the dash out, I spent an hour and a half wrestling the engine-side harness through the firewall and out of the engine bay. It sucked.
The plan now, after getting the heater core spiffed up, is to mock in the new fuse panel, and get a GM 90 amp alternator mounted. I'm going to keep the interior harness that feeds the dome and rear lights. Being inside the car, it's not in very bad shape. The engine side will be completely replaced with new wire all the way out to the front turn signals and headlights. The dash will also be getting new(er) Autometer gauges. I have a 5" tachometer, oil pressure, volt, and water temperature gauges to replace the intermittently working stockers.
It will be a very busy weekend. I have to have this thing back together and running by 8am on March 25.
Oh, and Louisville beat the snot out of Stanford today. Go Cards!
Subscribe to:
Posts (Atom)
